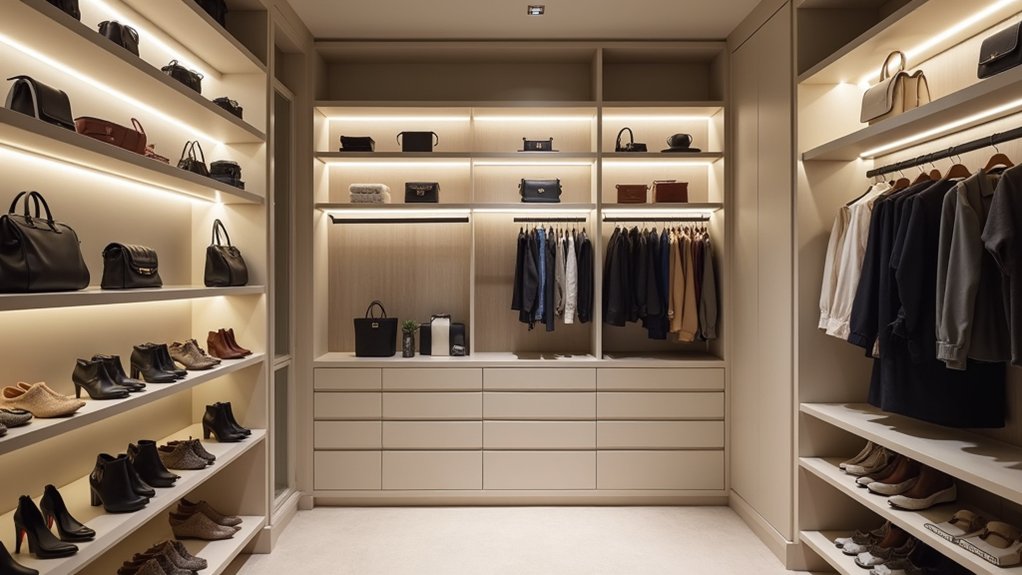
To create closet zones that keep everything easy to find, you’ll start by mapping your closet’s dimensions and marking shelf positions with blue tape. Next, sort items into five categories: daily essentials, seasonal wear, shoes, bags, and accessories. Position your most-used items in the prime zone between 30-60 inches from the floor. Use clear labels, drawer dividers, and dedicated organizers to define each space. The steps below walk you through building a system that actually lasts.
Map Your Closet Layout First
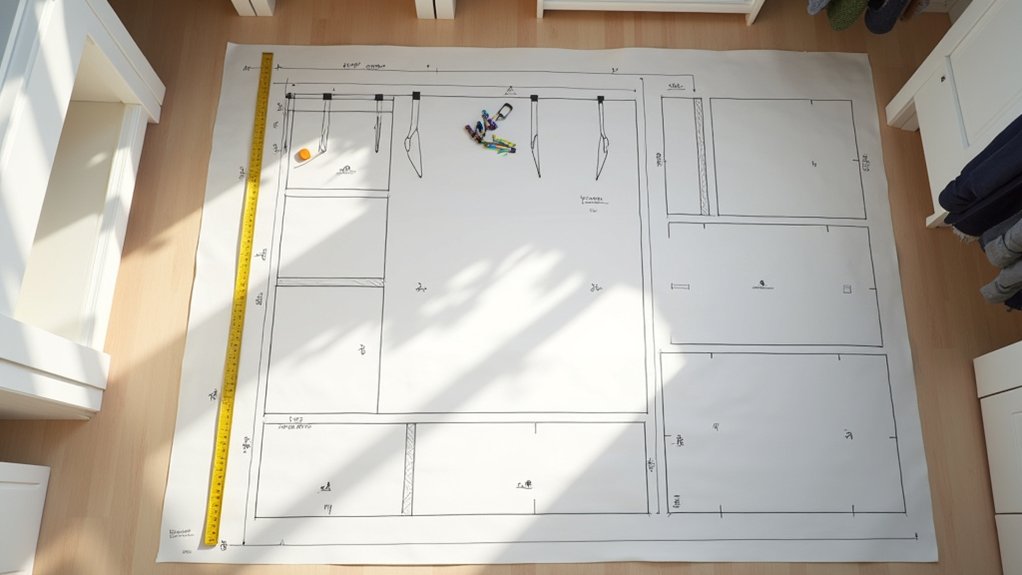
Before you purchase a single organizer or install any hardware, you’ll want to map out your closet’s exact dimensions and layout. Start by recording height from floor to ceiling, length of usable wall space, and depth of the area. Measure crucial dimensions for your clothing, 36 inches horizontally for shirts on a hanging bar and up to 52 inches vertically for dresses. Keep in mind that the highest clothing rod should be positioned no higher than 7 feet to ensure comfortable access for average height users.
Next, apply blue tape method directly on your walls. Mark shelf and rod positions with painter’s tape, then place tape on the floor to visualize shelf depth and hanging clothes clearance. This hands-on approach lets you test arrangements before committing to permanent installation. You can easily peel and reposition tape until everything feels functional. When creating your layout, draw separate views for each wall to ensure accurate visualization of how components will fit together. Combined with graph paper sketches, expect this planning phase to take 2-3 hours total. This thorough preparation prevents costly layout mistakes and ensures your closet system will serve you well for years to come.
Sort Items Into Five Closet Zone Categories
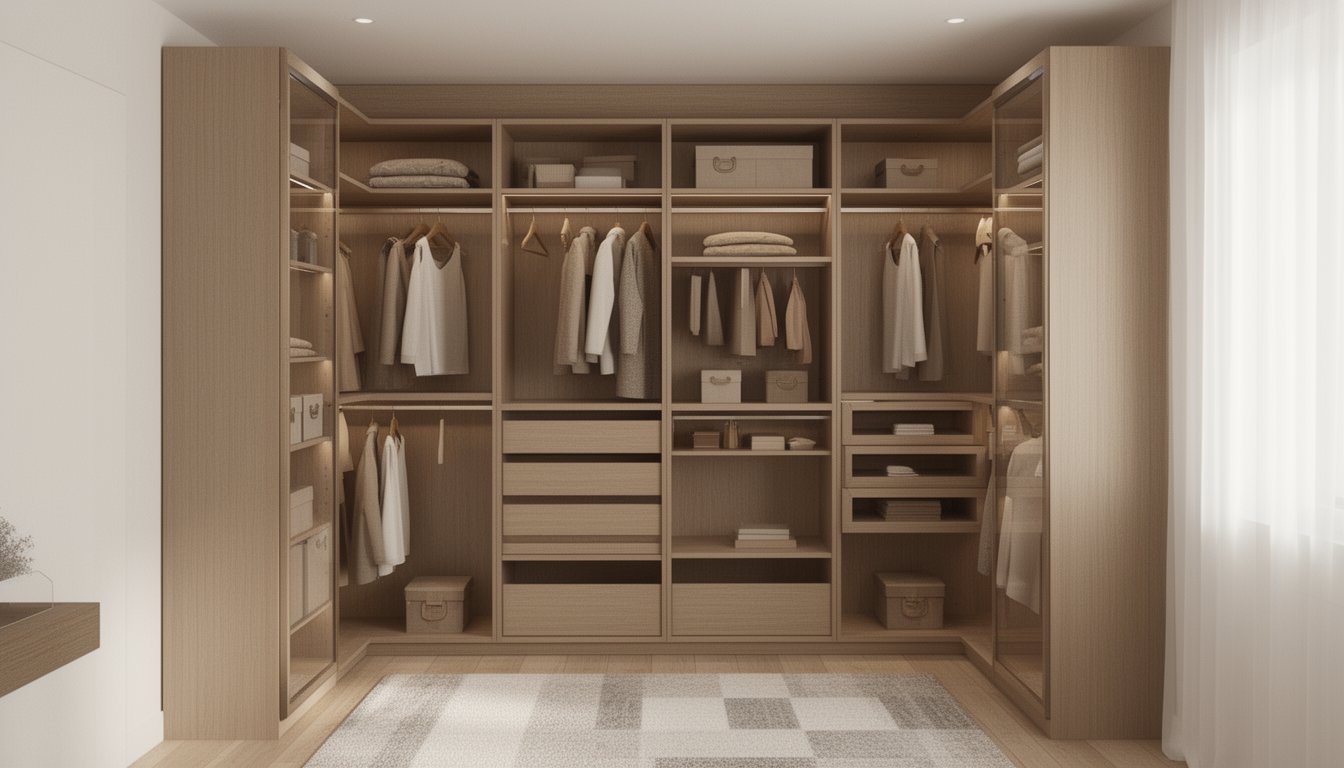
Start by placing your daily essentials, work attire, casual basics, and frequently worn pieces, in the prime zone between 30 and 60 inches from the floor where you can grab them without stretching or bending. Next, designate upper shelving above 60 inches for seasonal and occasion wear you won’t need for months at a time. This two-category foundation creates immediate structure and frees your most accessible space for items you’ll reach for every morning. Reserve the lower zone below 30 inches for shoes, bags, and storage drawers that benefit from floor-level accessibility. Before transferring items into these zones, declutter your wardrobe first to ensure you’re only organizing pieces you actually wear and love. Finally, create a fifth zone using racks and hooks on doors or walls for belts, hats, ties, and scarves that need dedicated vertical storage.
Daily Essentials Zone Placement
When you’re organizing your closet into functional zones, the everyday essentials zone deserves prime real estate, front and center where you can grab items without searching.
Position underwear, socks, and pajamas in drawers at waist height to maximize visibility and minimize reach distance. This strategic placement eliminates bending or stretching during your morning routine.
Organize by Daily Routine
Designate specific drawer sections based on your lifestyle needs. Keep athletic tops and bottoms in accessible drawers if you exercise regularly. Use drawer dividers to separate workout gear from denim and casual wear. These dividers are available in four size options to fit any drawer configuration.
Place your most-used items where you’ll naturally reach first. When everything has a dedicated spot within arm’s reach, you’ll streamline your daily routine and maintain organization effortlessly. Your essentials zone becomes the foundation for an efficient closet system. After washing or wearing items, return them to their permanent homes to keep your zones functioning smoothly over time. Organizing by category, just like in a retail store, makes putting outfits together easier and keeps your zones intuitive to navigate.
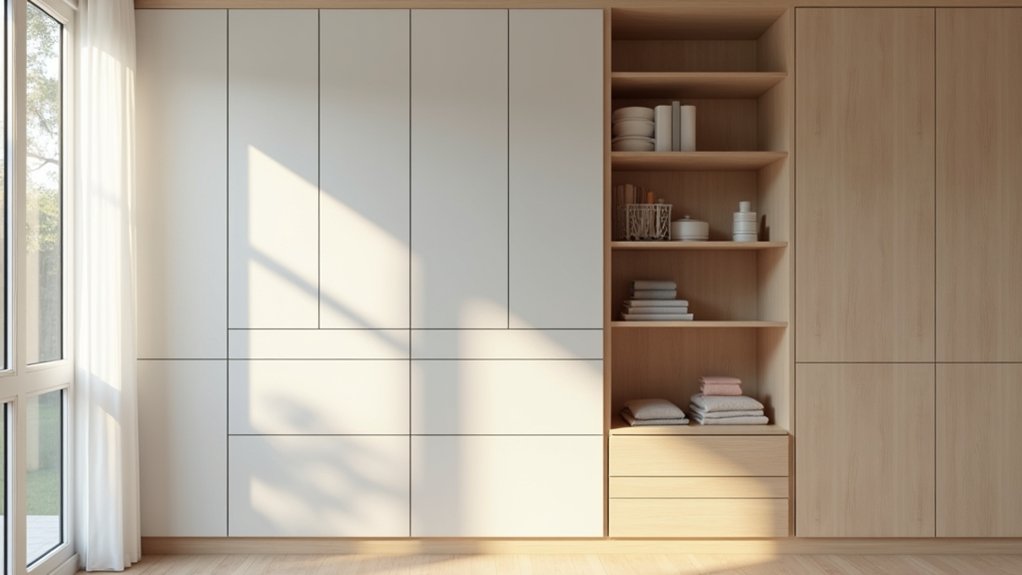
Seasonal Storage Category Setup
Organizing your wardrobe into five seasonal storage categories transforms a cluttered closet into a streamlined system that works year-round.
Start by dividing clothing into spring, summer, fall, winter, and general storage groups. Categorize storage options using clear, labeled bins for each season, lightweight jackets and rain gear for spring, swimsuits and sundresses for summer, bridging sweaters for fall, and heavy coats for winter. Clear plastic bins allow visibility of contents without needing to open each container, making it easy to locate specific items quickly.
Maximize vertical storage space with overhead shelves and under-bed compartments for off-season items. Vacuum-seal bulky winter coats to reduce volume dramatically. Use breathable bags with cedar blocks for delicate pieces, and add lavender sachets to summer storage bins. Storage bags with transparent front windows work especially well for summer dresses and skirts, letting you identify contents at a glance. Before placing items in storage, ensure all clothing has dried completely for at least 24 hours to prevent mold and mildew growth.
Apply the one-year rule: if you haven’t worn something in twelve months, it’s time to let it go. This keeps your system functional and clutter-free.
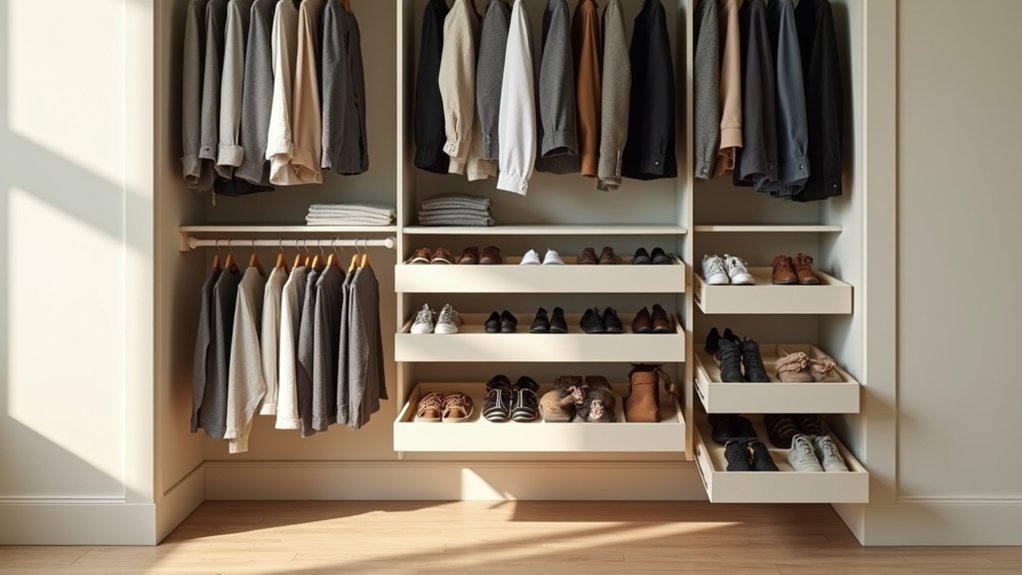
Create Dedicated Closet Zones for Shoes, Bags, and Accessories
Dedicated zones transform a cluttered closet into a functional storage system where every item has its place. Start by sorting shoes by frequency of use, occasion, and season. Count your pairs by type to determine which organizers you’ll need, cubbies for everyday sneakers, slanted racks for heels, or stackable bins for seasonal footwear. Well-organized shoe storage also protects shoes from wear and tear that can occur when footwear is piled together haphazardly.
| Zone | Recommended Storage Solution |
|---|---|
| Shoes | Tiered racks, cubbies, hanging organizers |
| Bags | Shelf dividers, hooks, over-the-door racks |
| Accessories | Vertical pockets, labeled bins |
| Seasonal Items | Drop-front boxes, stackable bins |
When you designate dedicated accessories storage zones, you’ll organize accessories according to use patterns. Install hooks for daily handbags, use acrylic dividers for clutches, and reserve labeled boxes for seasonal swaps. Consider adding a pull-out belt rack to keep belts visible and easy to access when getting dressed. As you sort through your collection, donate pairs you never wear and discard any worn out or irreparable shoes to free up valuable space.
Position Everyday Zones at Eye Level for Quick Access
Your prime reach zone, the space between your shoulders and hips, deserves your most frequently worn items for effortless daily access. You’ll want to position everyday essentials like go-to shirts, pants, and accessories front and center where you can grab them without stretching or bending. This strategic placement transforms your morning routine by putting everything you need within arm’s reach. Expert designers can incorporate adjustable shelving and rods that adapt to your changing wardrobe needs while keeping frequently used items perfectly positioned.
Prime Reach Zone Essentials
When you open your closet door, the items positioned between 52 and 72 inches from the floor represent prime real estate, your grab-and-go zone that requires zero extra movement to access.
Weekly Workwear Positioning
Reserve this zone for your current week’s work attire and daily casual clothes. These pieces, roughly 20% of your wardrobe, get worn 80% of the time. Install adjustable shelving at eye level (60-66 inches) for folded items and position your upper rod at 78-84 inches for shirts and blouses.
Layering Solutions for Shifts
Store lightweight jackets and cardigans within this prime zone for quick outfit adjustments. Double-hanging rods maximize vertical space while keeping layering pieces visible. Add 1-2 pairs of daily-wear shoes and regular accessories to complete your morning routine essentials, all accessible without bending or stretching.
Daily Items Front Center
Because most people wear only 25% of their wardrobe regularly, positioning these everyday pieces between 30 and 60 inches from the floor transforms your morning routine. This prime zone, your closet’s equivalent of beachfront property, keeps work attire and daily essentials visible and within arm’s reach.
Place your most-grabbed items front and center at eye to waist level. With an average wardrobe containing 148 pieces, personalized outfit organization means identifying which items you actually reach for during morning prep. Reserve this high-visibility space exclusively for those pieces.
Your closet lifestyle routines benefit immediately from this strategic placement. You’ll reduce time spent searching through stacks, prevent the “floordrobe” habit that affects many adults, and start each day with quick access to exactly what you need.
Use Labels and Dividers to Define Each Zone
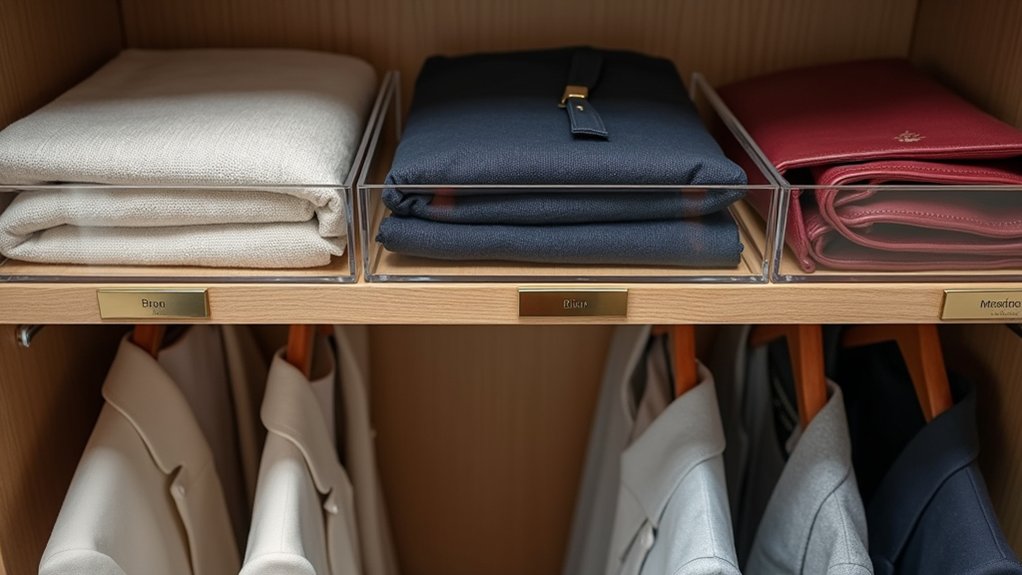
Although dividers physically separate your shelf space, labels transform those sections into a functional system you’ll actually maintain. Choose action-based labels like “Weekday Knits” or “Workout Layers” instead of color names, which fail under different lighting conditions. This approach reduces daily decision time by up to 23 seconds per outfit selection.
When selecting dividers, match your divider customization options to shelf depth and contents. Metal L-brackets suit heavy knits on deep shelves, while adjustable tension rods work for lightweight items. Consider item height considerations carefully, dividers shouldn’t exceed 60% of shelf depth to prevent tipping.
Anchor dividers to the shelf frame rather than the surface to prevent shifting when you pull stacked items. Limit zones to two per shallow shelf and five maximum overall to avoid cognitive overload.
Declutter What Doesn’t Fit Your Zone System
Before your zone system can function at full capacity, you’ll need to purge items that no longer serve your wardrobe goals. Apply the one-year rule: if you haven’t worn it in twelve months, it’s time to let go. This unworn clothing analysis sharpens your personal style while freeing valuable zone space.
| Action | Benefit |
|---|---|
| Remove items unworn for one year | Identifies pieces that don’t fit your lifestyle |
| Evaluate by clothing category | Prevents overwhelm and reveals excess |
| Clear floor items completely | Maximizes usable zone space |
| Schedule weekly mini-sessions | Maintains clutter-free zones long-term |
| Donate discarded pieces | Creates discarded attire opportunities for others |
Empty your closet completely to assess your full inventory before reassigning items to their designated zones.
Rotate Closet Zones Seasonally to Prevent Clutter Creep
Once you’ve cleared out the pieces that no longer serve your wardrobe, you’ll want to establish a seasonal rotation schedule that keeps your zones working efficiently. Use seasonal storage rotations twice yearly, October and April, to swap out-of-season items like summer dresses, shorts, and sandals for heavier fabrics and darker colors.
Before storing pieces, wash worn clothes, repair any damage, and guarantee everything’s completely dry. Place off-season items in smaller plastic bins for easy movement to high shelves or alternate storage areas.
Keep versatile layering pieces, light jackets, cardigans, jeans, accessible year-round. Monitor changing wardrobe needs through monthly check-ins to prevent buildup. This approach certifies you’ll only see current season clothes, reducing the 17 minutes daily many spend choosing outfits while maintaining clutter-free zones.
Frequently Asked Questions
How Much Does a Professional Closet Organizer System Typically Cost to Install?
You’ll typically pay $628 to $2,525 for average installation costs, with prefab systems running $400 to $2,200 and custom solutions reaching $1,000 to $8,000. If you’re watching your wallet, budget friendly DIY options start at just $150 for basic wire systems. Factor in labor at $200 to $1,600 depending on complexity. Consider your space, desired features, and whether you’ll tackle installation yourself to determine your ideal investment.
What Are the Best Closet Organizer Brands Recommended by Professional Home Organizers?
Professional home organizers consistently recommend several popular closet organizer brands for their versatility and quality. You’ll find Container Store’s Elfa system tops many lists for its modular flexibility, while ClosetMaid delivers strong customer satisfaction with closet organizers seeking budget-friendly solutions. Easy Track offers customizable configurations for walk-ins, and Allen + Roth provides solid wood luxury appeal. Start by evaluating your space, then match the brand’s strengths to your specific organization needs.
How Long Does It Take to Fully Organize a Walk-In Closet?
You’ll typically need 4-8 hours to fully organize a walk-in closet, depending on its size and current state. Start by removing everything and sorting items into keep, donate, and discard piles. When you organize closet seasonally, you’ll maximize closet storage space more effectively. Measure your dimensions, install appropriate systems, then place frequently used items at eye level. This systematic approach saves you time daily and reduces ongoing maintenance considerably.
Can Closet Organization Systems Increase My Home’s Resale Value Significantly?
Yes, closet organization systems can deliver increased resale value of 50-70% of your investment. You’ll see improved home aesthetics that attract buyers willing to pay premium prices. Here’s your action plan: install quality built-in systems that recoup $1,100-$1,500 on average, focus on walk-in closets where over 60% of buyers pay more, and choose materials that enhance perceived luxury. Your organized spaces will help your home sell faster.
What Materials Work Best for Humid Climates When Choosing Closet Organizers?
You’ll want to prioritize moisture resistant materials like high-pressure laminate, marine-grade plywood, or powder-coated metal systems that won’t warp or corrode. Choose thermally fused laminate panels for shelving and stainless steel hardware for hinges and rails. Add mildew proof storage containers for clothing and accessories. Install louvered doors or built-in vents to promote airflow, and consider a small dehumidifier to maintain ideal humidity levels throughout your closet space.