You’ll save the most money by installing LED strip lights inside aluminum channels with frosted diffusers, they create a refined, built-in appearance without expensive electrical work. Add battery-powered motion sensors above your closet entrance for hands-free operation that conserves energy, or mount puck lights with adhesive tape for instant illumination in under an hour. Combine multiple light sources and position them strategically to eliminate shadows while maximizing your space’s functionality. The following sections outline specific installation techniques that’ll transform your closet into a professionally lit, organized space.
Install LED Strip Lights With Aluminum Channels for a Polished Look

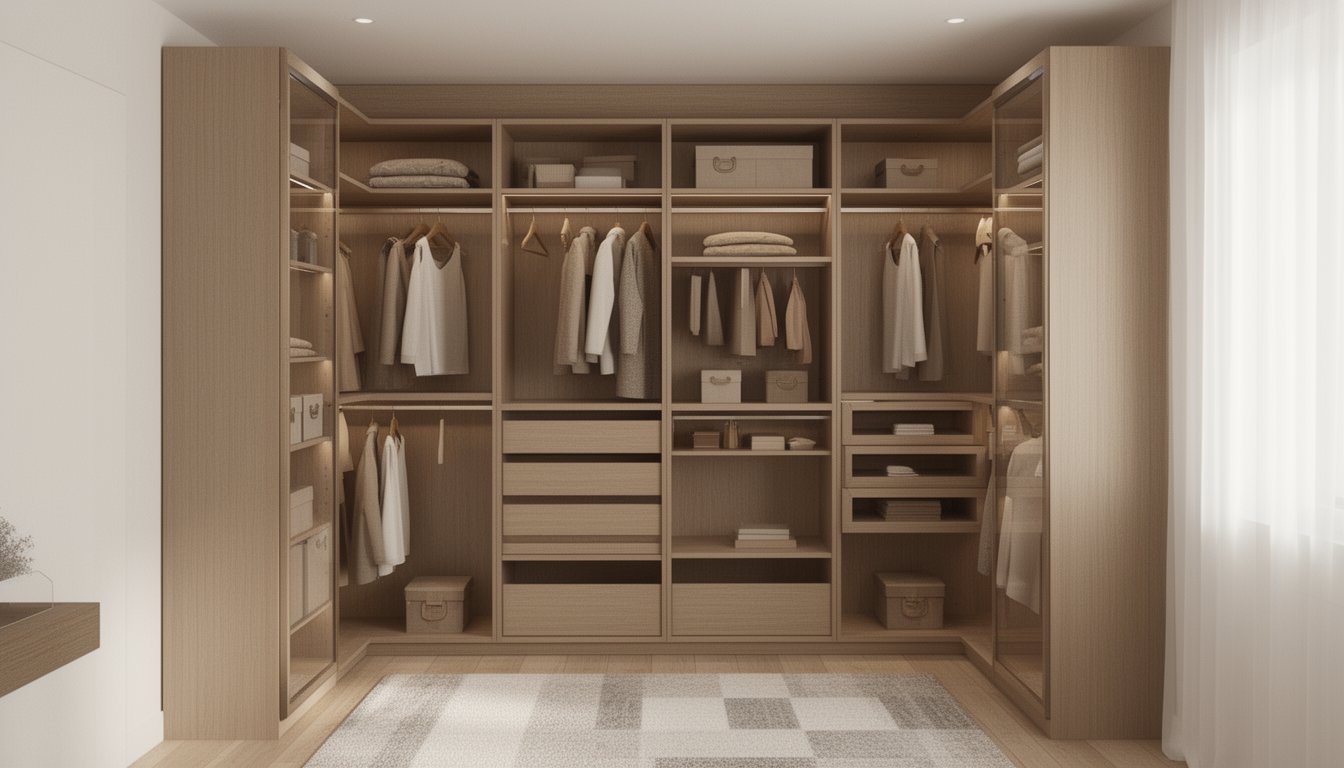
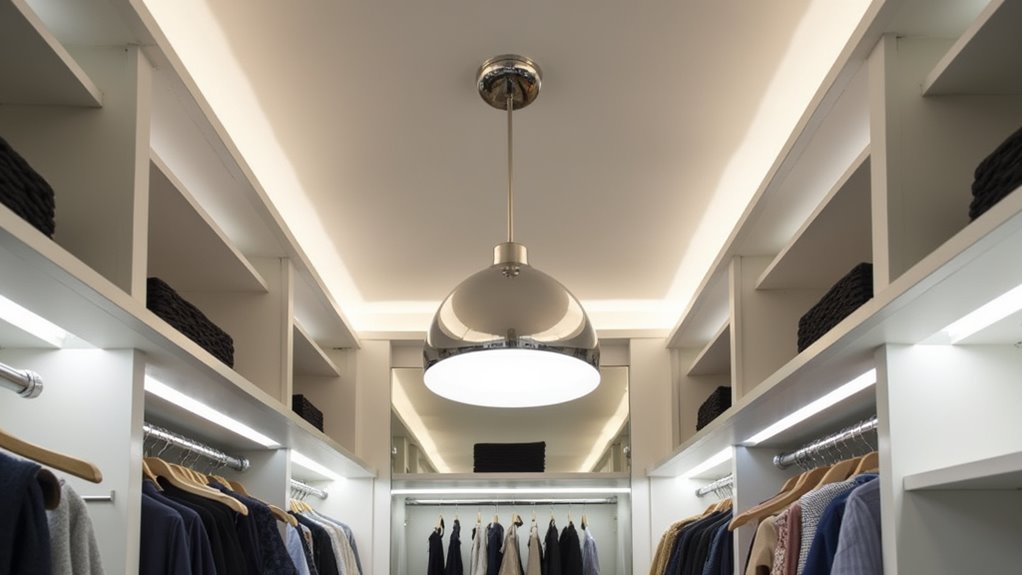
When you’re planning a closet lighting upgrade, aluminum channels transform basic LED strips into a refined, built-in lighting system. You’ll select from surface-mount, recessed, or corner profiles based on your space configuration. Choose frosted diffusers to reduce glare and create uniform light output throughout your closet.
Mount channels using clips for future adjustability or screws for permanent installation. Clean channels with rubbing alcohol before pressing LED strips firmly into place, preventing sagging over time. Center the strip light within the channel, leaving an equal amount of space on either side for optimal appearance. The aluminum acts as a heat sink to dissipate heat from the LEDs, extending their operational lifespan. You can integrate motion sensors and adjustable light intensities for hands-free operation and customized brightness levels.
Secure wiring with cable clips and install end caps to prevent dust accumulation. The aluminum construction boosts heat dissipation, extending LED lifespan while delivering professional aesthetics that optimize your closet’s functionality and visual appeal.
Add Motion-Activated Sensors for Hands-Free Convenience
You’ll want to position your PIR sensor above shoulder height at the closet entrance to optimize detection accuracy while minimizing false triggers from passing movement. Battery-powered units offer you the swiftest installation with no wiring required, ideal when you’re working with rental restrictions or tight timelines, while hardwired options provide permanent, maintenance-free operation if you have electrical access. The motion sensor will automatically shut off after 10 seconds of no movement, conserving battery power and extending the life of your system. Motion-activated lighting enhances energy efficiency by ensuring your closet lights only activate when needed, reducing overall electricity consumption. For a welcoming closet environment, pair your motion sensors with LED strip lighting that illuminates as soon as you open the door. Before committing to either approach, consider your closet’s traffic patterns and your willingness to swap batteries every 6-12 months versus running new electrical lines.
PIR Sensor Installation Tips
Installing a PIR motion sensor transforms your closet lighting from a manual task into an effortless, automatic experience, but placement and configuration determine whether you’ll enjoy seamless operation or frustrating false triggers. Your sensor placement strategy should prioritize unobstructed line-of-sight near the entrance or ceiling-mounted for prime coverage. For long or L-shaped closets, you’ll need multiple sensors to eliminate blind spots.
Configure your system for maximum efficiency:
- Set ideal sensitivity levels matching your closet size to avoid hallway false triggers
- Adjust delay-off timers between 30 seconds and 2 minutes for convenience
- Route wiring along corners or above shelves using clips for professional appearance
- Test thoroughly after installation and periodically verify consistent performance
When working with LED strip installations, attach the motion sensor to the LED strips directly before mounting the profile for easier access and streamlined wiring. Plan your installation timeline wisely, as this moderate difficulty project typically requires approximately 3 hours to complete from start to finish. Always shut off the circuit breaker before hardwiring installations.
Battery vs. Hardwired Options
Motion sensors deliver hands-free convenience, but your choice between battery-powered and hardwired lighting systems fundamentally shapes your closet’s functionality, budget, and long-term maintenance requirements.
| Factor | Battery-Powered | Hardwired |
|---|---|---|
| Upfront Cost | $10, $60 per fixture; DIY installation | $30, $200+ per fixture; $100, $300 installation |
| Space Utilization | Flexible placement anywhere; no outlet dependency | Fixed location; requires existing wiring |
| Energy Efficiency | Motion-activated LEDs reduce waste; battery replacement every 3, 6 months | Consistent high output; motion sensors optional for efficiency |
Battery systems offer repositionable, cord-free designs ideal for renters maximizing awkward spaces. Hardwired fixtures provide permanent, brighter illumination with minimal maintenance. Your selection depends on whether flexibility or performance takes priority in your space utilization strategy. Battery-powered options excel at accent lighting for shelving and corners, while hardwired systems dominate overhead illumination where consistent brightness matters most. Hardwired installations achieve a professional, built-in appearance by connecting directly to home wiring, eliminating visible cords that can clutter your closet’s aesthetic. Both lighting types automatically turn on when detecting movement, helping you save energy while enhancing convenience in your closet space.
Use Battery-Operated Puck Lights for Quick and Easy Installation
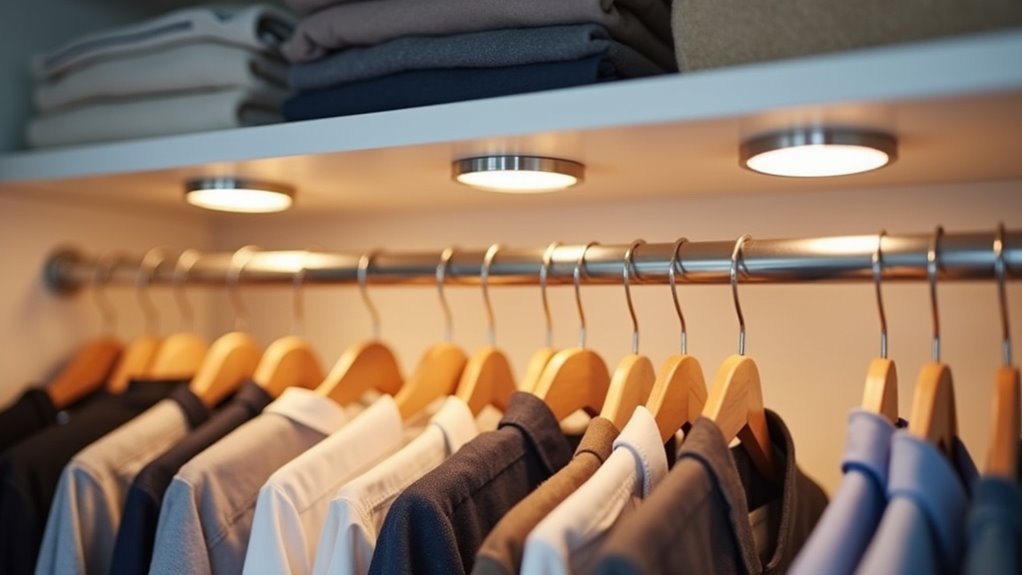
Battery-operated puck lights cut through the complexity of traditional closet lighting by eliminating electrical work entirely. You’ll install them using screws or double-sided tape in under an hour, with no electrician fees draining your budget. The battery powered design means you’re free to reposition fixtures as your storage needs evolve.
Skip the electrician and rewire your closet lighting strategy, battery-powered pucks install in minutes, adapt instantly, and cost nothing extra.
These fixtures deliver professional results through:
- Even illumination that mimics recessed lighting without structural modifications
- Adjustable positioning to target shelving, drawers, and hanging areas precisely
- Motion-sensor options that activate automatically for hands-free convenience
- Versatile mounting on wood, drywall, or metal surfaces throughout any closet type
You’ll optimize your vertical space while LED technology provides 20,000, 50,000 hours of reliable performance. Battery replacement occurs every 3, 12 months, keeping maintenance minimal and your lighting investment working efficiently. The surface mounting design eliminates the need for cutting recessed holes into your closet walls or ceilings. These hockey puck-shaped fixtures provide a compact profile that won’t interfere with your closet’s aesthetic or storage capacity. Battery-operated puck lights excel in areas without electrical outlets, making them particularly valuable for walk-in closets or standalone wardrobes far from existing wiring.
Create Ambient Glow With DIY Rope and Cove Lighting
Rope and cove lighting transforms your closet into a boutique-style space by casting soft, indirect illumination that highlights architectural features while maintaining functionality. You’ll optimize every inch by installing LED rope light kits behind molding, upper shelves, or under hanging rails, creating ambient glow that expands perceived space while operating 80% more efficiently than incandescent options.
Plan your layout carefully, measuring closet dimensions and positioning power cords near outlets. Most rope lights trim only at designated cut points spaced 18, 24 inches apart. Secure them with clips every 3, 4 inches to prevent sagging and maintain professional appearance. Before finalizing your installation, test the bulb’s heat output by holding it while illuminated to ensure safe operating temperatures.
Choose multi color schemes to customize your space, and add dimming controls for flexible ambiance and energy savings. The small LED bulbs are linked together in a PVC jacket, making them durable and moisture-resistant for various closet environments. Always install with power disconnected, use proper end caps and connectors, and conceal rope within decorative trim for seamless results.
Maximize Brightness With Mirrors and Reflective Surfaces
You can dramatically augment your closet’s brightness without adding more fixtures by using mirrors and reflective surfaces to redirect existing light into shadowed areas. Position large mirrors opposite windows or directly across from your installed LEDs to double their effective output and create an even, shadow-free environment. Pair these strategic placements with light-colored, high-gloss finishes on shelving and walls to amplify the glow throughout your space while making it feel considerably more expansive.
Strategic Mirror Placement Tips
When natural or artificial light sources feel insufficient in your closet, strategic mirror placement transforms dim spaces into bright, functional areas without adding a single fixture. You’ll boost visibility by positioning mirrors opposite or adjacent to windows, capturing daylight and redirecting it throughout your storage zone. Angled mirror placement in corners scatters illumination at multiple angles, eliminating shadows in compact spaces.
For artificial lighting improvement, mount mirrors behind existing fixtures to double their perceived output using optimized reflector finishes like silver-backed or low-iron glass:
- Install full-length mirrors with LED strips inside closet doors for space-efficient brightness
- Position frameless mirrors on side walls to spread light laterally into dark corners
- Place mirrors behind wall sconces to create dual light source effects
- Use rounded-edge mirrors in tight spaces to soften glare and reflection patterns
Light-Colored Finishes Amplify Glow
Closet brightness depends just as much on surface color as it does on fixture wattage, light-colored finishes reflect up to 80% more light than dark alternatives, instantly amplifying your lighting investment. Eggshell or satin paints outperform matte options by maximizing diffusion without glare. Coordinated color combinations of white walls, pale shelving, and light flooring create seamless luminance throughout your space.
| Surface | Best Light-Reflecting Finish |
|---|---|
| Walls/Ceiling | Satin white or pale gray paint |
| Shelving | Light laminate or glossy melamine |
| Hardware | Polished chrome or brushed nickel |
Reflective hardware upgrades, glossy closet rods, metallic drawer pulls, and glass cabinet fronts, bounce light into shadowed corners. Peel-and-stick vinyl panels and white shelf liners offer affordable DIY solutions that preserve your existing structure while dramatically enhancing brightness.
Upgrade to LED-Lit Closet Rods for Designer-Style Illumination
As lighting technology advances, LED-lit closet rods have emerged as the ideal fusion of function and sophistication for compact spaces. You’ll achieve evenly distributed illumination that eliminates shadows while maintaining clean lines. Proper power source selection guarantees your system delivers consistent voltage, typically 12V or 24V DC, while heat dissipation considerations remain minimal due to LED efficiency.
Install high-density strips (60+ diodes/meter) behind integrated diffusers for that spotless, professional finish:
- Cut rods 3/8″ shorter than closet width for ideal mounting clearance
- Select 2700K for boutique warmth or 4000K+ for contemporary aesthetics
- Add supplementary supports every 48″ to prevent sagging
- Maintain proper wire polarity when connecting to compatible LED drivers
You’re investing in 25,000+ hour lifespans while reducing energy consumption by 80%, creating luxury-grade results without professional installation costs.
Combine Multiple Light Sources for Shadow-Free Coverage
Single-source lighting creates harsh shadows that obscure your clothing details and waste valuable storage real estate. You’ll achieve professional shadow-free coverage by combining ambient, task, and accent sources throughout your closet.
Position recessed fixtures in a grid pattern across your ceiling for even base illumination. Mount adjustable track lighting to highlight specific zones like shoe racks or accessory displays. Add vertical LED strips along sidewalls to eliminate body shadows when you’re selecting outfits.
| Light Layer | Fixture Type | Primary Function |
|---|---|---|
| Ambient | Recessed/Flush Mount | comprehensive brightness distribution |
| Task | LED Strip (shelves) | Illuminate stored items directly |
| Task | Under-Rod Lighting | Light hanging garments |
| Accent | Vertical Panels | Reduce sidewall shadows |
| Accent | Track Lighting | Spotlight featured sections |
This multi-source approach eliminates dead zones while maintaining energy efficiency.
Choose High-CRI LEDs for Accurate Color Representation
When selecting LEDs for your closet project, you’ll need to understand the Color Rendering Index (CRI) scale, which measures how accurately a light source displays colors compared to natural sunlight on a 0, 100 scale. For ideal wardrobe selection, you should choose LEDs with a CRI of 90 or higher, as they’ll reveal true fabric colors and help you distinguish between similar shades like black and navy. Pairing high-CRI LEDs with the right color temperature, typically 3000K to 4000K for closets, ensures you’ll see your clothing exactly as it appears in natural daylight.
Understanding CRI Rating Scale
While you’re selecting LED fixtures for your closet lighting project, understanding the Color Rendering Index (CRI) rating scale will guarantee you choose bulbs that display your wardrobe’s true colors. CRI benchmarking standards measure light sources from 0 to 100, with higher ratings delivering superior color accuracy. CRI testing procedures compare how your chosen LED renders colors against reference sources like natural sunlight.
Your ideal CRI selection guide:
- 90+ CRI: Delivers excellent color accuracy, your clothes appear exactly as they will in daylight
- 80, 89 CRI: Provides good rendering suitable for general closet applications
- Below 80 CRI: Creates distorted, dull colors that’ll compromise outfit coordination
- 100 CRI: Perfect reference standard (sunlight, incandescent) for comparison
You’ll maximize your closet’s functionality by investing in 90+ CRI LEDs, ensuring every garment’s true hue is accurately represented during selection.
Ideal Color Temperature Range
Color temperature works hand-in-hand with CRI to determine how effectively you’ll identify clothing colors in your closet. Your color temperature selection should fall between 3000K and 4000K to balance visual comfort with accurate color rendering. This range guarantees your ability to distinguish fabrics and detect subtle differences between dark hues.
| Color Temperature | Visual Effect | Best Application |
|---|---|---|
| 3000K (Soft White) | Warm, neutral tone | Traditional closets needing comfort |
| 3500K (Very White) | Clear with sparkle | Modern walk-ins requiring detail |
| 4000K (Natural White) | Crisp, bright illumination | Color-critical wardrobe spaces |
Pair your chosen temperature with a CRI rating of 90+ to make certain clothing appears true and vibrant, preventing color confusion during outfit selection.
CRI Impact on Wardrobe
- Silk, wool, and linen materials display authentic textures under CRI 90+ lighting, enabling proper appreciation of your investment pieces
- Color-matching accuracy increases wardrobe versatility, reducing purchase returns caused by unexpected color shifts
- Eye strain decreases during morning selection, improving comfort in your optimized closet space
- Professional-grade results match retail changing rooms, ensuring consistent color perception across environments
High-CRI LEDs deliver energy efficiency while maintaining superior color fidelity for your needs.
Hide Wiring With Custom Channels and Cable Management
Exposed wiring disrupts even the most carefully designed closet lighting system, but custom channels and strategic cable management transform tangled cords into a polished installation. Aluminum LED channels with diffusers conceal wires while delivering streamlined aesthetics. Cut channels to your closet’s exact dimensions, then preload LED strips before mounting to avoid cramped-space struggles.
| Installation Method | Best Application |
|---|---|
| Double-sided adhesive tape | Smooth surfaces, quick setups |
| Countersunk screws | Heat-prone or weight-bearing areas |
| Mounting clips | Uneven surfaces requiring alignment |
Multi-zone cable routing separates circuits for shelves, drawers, and rods within channel bodies. Make 45-degree corner cuts for seamless junctures. Clean mounting surfaces with isopropyl alcohol before applying adhesive. Finish with customized channel finishes, painted end caps and color-matched holders that eliminate visual distractions while maintaining full wire concealment throughout your space.
Install Rechargeable Motion Lights to Reduce Maintenance Costs
Battery-powered motion lights cut down maintenance demands while delivering reliable illumination exactly when you need it. Unlike hardwired fixtures, these units eliminate electrician costs and feature rechargeable lithium-ion batteries that last up to 2.1 months per charge. Automatic shut-off timers conserve energy by turning off lights 12, 20 seconds after detecting no movement.
Installation takes minutes:
- Charge the unit via USB cable until the indicator signals full capacity
- Select your mounting location within the 2-meter detection range at closet entry or ceiling
- Apply adhesive or magnetic strips without drilling or damaging surfaces
- Test motion activation to confirm proper sensor alignment and coverage
LED technology provides 25,000+ hours of service, and damage-free mounting lets you reposition lights as your storage needs evolve, maximizing both functionality and budget efficiency.
Frequently Asked Questions
What Tools Do I Need to Start a DIY Closet Lighting Project?
You’ll need basic tools like a screwdriver, drill, wire cutters, and measuring tape to mount fixtures securely. For your LED light bulb selection, gather strip lights, motion sensors, and power supplies that match your setup. Include adjustable lighting fixtures with mounting hardware for flexible positioning. Don’t forget wire nuts, connectors, and an electrical tester for safe installations. If you’re hardwiring, add junction boxes and 14-gauge wire. This methodical approach guarantees you’ve got everything before starting, maximizing your closet’s potential efficiently.
Can I Install Closet Lighting in a Rental Without Damaging Walls?
Yes, you’ll protect your walls by utilizing battery-powered lighting with adhesive strips or magnetic mounts, no holes required. Consider motion-activated options that turn on automatically when you open your closet, maximizing convenience in your space. You can mount LED puck lights using damage-free 3M Command Strips that won’t affect your deposit. This approach lets you customize your lighting layout while keeping your rental in original condition, and you’ll easily remove everything when you move out.
How Much Does a Complete DIY Closet Lighting Project Typically Cost?
You’ll typically spend $70, $150 for a complete DIY closet lighting project, though costs vary based on your lighting type considerations. Battery-powered puck lights start around $30, $80, while LED strips with controllers run $100, $300. Energy efficiency impacts long-term savings; LED options reduce electricity costs considerably. For walk-in closets requiring multiple fixtures, expect $150, $300. You’re maximizing your space’s potential while avoiding $50, $250 per-fixture electrician fees, making DIY installation exceptionally cost-effective for your needs.
Will Adding Closet Lighting Significantly Increase My Electricity Bill?
No, closet lighting won’t dramatically impact your electricity bill when you choose energy-efficient options like LEDs. You’ll spend less than $0.05 monthly per fixture with proper installation methods that include motion sensors. By switching from 60W incandescent to 10W LED bulbs, you’ll reduce energy use by 80-90%. Your closet’s limited usage time, typically under two hours daily, keeps costs minimal while maximizing your space’s functionality and value.
Do I Need an Electrician or Can I Complete Everything Myself?
You can handle battery-powered or plug-in LED installations yourself, but hire an electrician for hardwired fixtures requiring new circuits or wall switches. Electrical safety considerations demand professional expertise when running new lines or upgrading old wiring. For lighting design considerations, you’ll want to guarantee proper fixture placement and clearance yourself with simple adhesive options. However, complex smart systems integrating with home automation often need professional setup. Always verify local code requirements before starting your project.